Basics
Installation
Use the npm commands below to install, update, and run Warden Code. This requires Node.js 18 or higher.
Install globally:
npm install -g warden-code
Update:
npm install -g warden-code
Run:
warden
CLI commands
With Warden Code, you can use the command line to generate a project, edit your code with an AI assistant, configure your Agent, and much more.
Run warden to initiate Warden Code and use the following commands:
| Command | Description | Guides |
|---|---|---|
/new | Create a new Agent interactively | |
/build | Enter the AI-powered mode to build your Agent | |
/chat | Chat with a running Agent using A2A or LangGraph | |
/config | View and edit the Agent configuration | |
/register | Register the Agent onchain (ERC-8004) | |
/activate | Activate a registered Agent onchain (ERC-8004) | |
/deactivate | Deactivate a registered Agent onchain (ERC-8004) | |
/help | Show available commands | N/A |
/clear | Clear the terminal screen | N/A |
/exit | Exit the CLI | N/A |
Running the Agent
The npm commands below allow you to build and initiate your Agent. Navigate to your project's root directory and run them in a separate terminal window.
Build:
npm run build
Run:
npm start
Run with x402 payments temporarily disabled:
X402=false npm start
Project structure
When you create a new Agent, Warden Code generates the following project structure:
my-agent/
├── src/
│   ├── agent.ts      # Your Agent's logic: the handler function
│   ├── server.ts     # Server setup, static file serving, protocol routing
│   └── payments.ts   # x402 payment setup (created only if you enable x402)
├── public/
│   ├── index.html    # The chat frontend: auto-loads the A2A Agent Card, x402 wallets
│   └── .well-known/
│       ├── agent-card.json           # The A2A Agent Card: the identity, capabilities, skills
│       └── agent-registration.json   # ERC-8004 registration metadata
├── package.json
├── tsconfig.json
├── Dockerfile
├── .env.example
└── .gitignore
The src/public/ directory is served as static files. Add any additional assets (icons, stylesheets, scripts) and they will be available at their corresponding URL paths.
Agent models
Depending on the choices you make when creating an Agent, Warden Code uses one of the supported Agent models:
- OpenAI + Streaming: A GPT-powered Agent with streaming responses
- OpenAI + Multi-turn: A GPT-powered Agent with conversation history
- Blank + Streaming: A minimal streaming Agent that echoes input
- Blank + Multi-turn: A minimal multi-turn conversation agent
Build mode
You can edit your Agent through the CLI, in the AI-powered build mode. It supports the following LLM providers:
- OpenAI (default)
- Anthropic
To start, use the /build command and set up an LLM provider. For a full step-by-step guide, see Build with AI.
In the build mode, you can prompt the assistant and use the following commands:
| Command | Description |
|---|---|
/model | Switch between LLM providers and models at any moment. |
/rebuild | Rebuild the project. This triggers npm run build. |
/chat | Chat with the Agent. The URL is resolved from .env. |
/exit | Exit the build mode. |
Frontend
Every generated Agent includes a chat frontend allowing you to interact with Agents through a user interface.
In production, the frontend available on your Agent's public URL. When testing an Agent locally, you can access it on the local host:
http://localhost:3000/
This frontend implementation supports the following features:
- Chat
You can chat with your Agent through a user interface. Responses are rendered as GitHub-flavored Markdown, including headings, code blocks, lists, tables, and links. - Agent Card
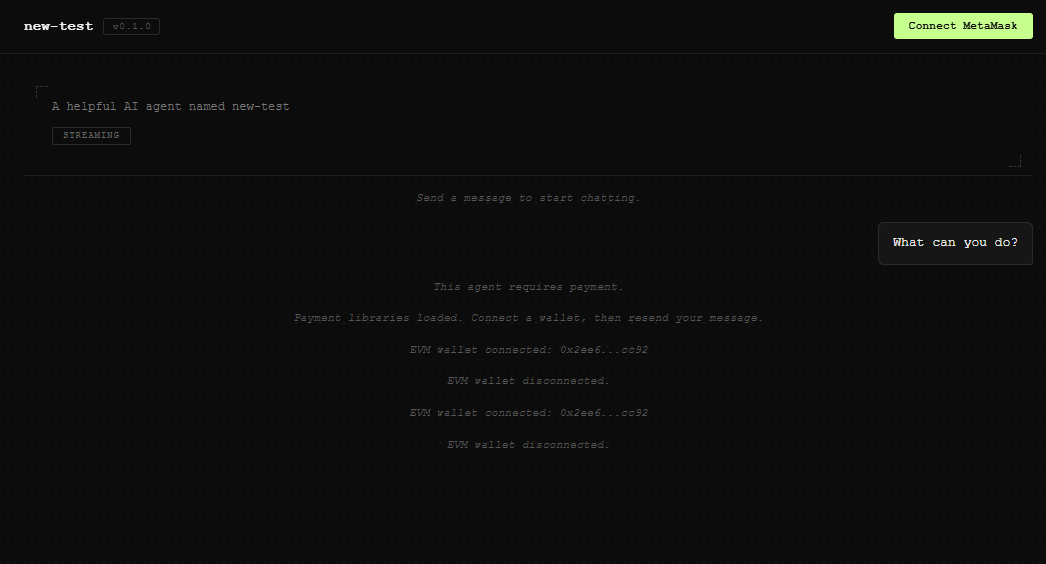
The frontend loads the Agent Card fromsrc/public/.well-known/agent-card.jsonand displays the Agent name, description, capabilities, and provider info. If the Agent Card has an image field, it's used as the page favicon. Skills are shown as clickable example prompts. - x402 payments
When x402 payments are enabled, the frontend readssrc/public/.well-known/agent-registration.jsonon page load and displays a button for connecting to MetaMask. Transaction hashes included in payment responses link to a block explorer.
API server
Agents generated with Warden Code use a server that is compatible with the A2A protocol and LangGraph Agent Server API. By default, the server requires API key authentication.
You can find the server setup in src/server.ts.
For details about the exposed endpoints, see the reference sections below:
For usage examples, see these articles:
API key authentication
When you create an Agent, Warden Code generates a random Agent API key. By default, the API server requires it for authentication.
The Agent API key is stored in the .env file as AGENT_API_KEY.
This key is used in the following ways:
-
API requests
POST requests require authentication, while GET requests remain public. The key must be passed as a Bearer token in theAuthorizationheader:-H "Authorization: Bearer AGENT_API_KEY" -
CLI usage
If you chat with your Agent using the/chatcommand, it automatically readsAGENT_API_KEYfrom.env. If no key is found or the key is rejected, Warden Code prompts you for a valid key. -
Usage with x402
When x402 payments are enabled, API key authentication takes priority. Requests with a valid Bearer token bypass the payment middleware entirely. Requests without a valid key fall through to the x402 payment flow.
- To rotate the key, replace the value and restart or redeploy the Agent server.
- To disable authentication, remove the
AGENT_API_KEYline from.env. In production, omit the variable from the hosting service configuration.